Posted by dravon in LiveJournal, Project Review | 1 Comment
Green and Tan Experimental Doublet
The Man has been needing some new clothes for Fair. Seriously. NEEDING them. He’s down to one doublet and that’s falling apart. Not having made one before, last fall I set out to do so. A few things went into this experimental first:
(1) test the theory that the lining can hold the poof of the upper sleeve without adding extra bulk to the garment itself
(2) create the garment so that it could be slashed and still look good AND
(3) be as light-weight as can be reasonably made, since I don’t want my man to suffer a heat stroke every time he gets all made up
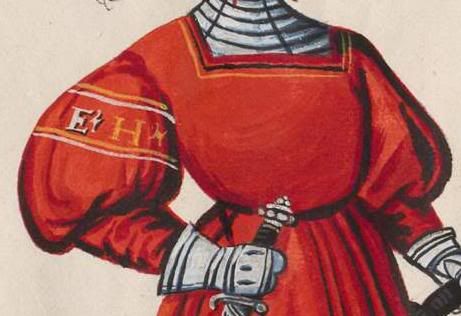
Here is the source image for the sleeves that I decided to try: It’s page 104 of the Hofkleiderbuch and is dated 1520.

As for requirements 2 and 3, I turned to the Stash. Best to use that for experimental stuff rather than go buy more. I found a gorgeous olive green cotton which I decided to use as the outter shell. After that, I found a nice tan linen which I decided to use as the second layer, so that when the green is slashed through the linen is what is visible.
After coming up with the pattern (which was done through a body block, since at that point I didn’t have the body double dress form yet), I decided on where the slash lines would go. In between these, I drew a chalk line (that’s the white line you can see on the garment) and then stitched over that. This then made the cotton and linen layers more like a single layer from this point forward and I treated it just like a slightly heavier fabric in terms of sewing.
For the sleeve, I did a slash and spread method. Basically, I wanted the part where the arm met the body to NOT have extra material. In looking at the soure image, I’m not seeing obvious pleating or gathering and I liked that clean line from the shoulder. Helps to also keep the eye falling over that line without interuption, further adding to the impression of those hideous rounded shoulders so popularly depicted at this time. Do bear in mind, I’ve seen PLENTY of images in which it’s obvious the upper sleeve is indeed gathered and/or pleated. I personally think all three are perfectly valid and period correct methods of construction. The question is which method do you, as the designer/wearer, want to use? I wanted to use the smooth transition method for this test.
In the source, you can see that the forearm is fairly fitted, with the upper arm being all balloony. The other arm is straighter, and that division remains. Later images have practically no division between the balloony upper arm and the more fitted forearm, but in those images the balloony and fitted are neither as exaggerated, and so I can make the argument that my interpretation of this image is not in-accurate.
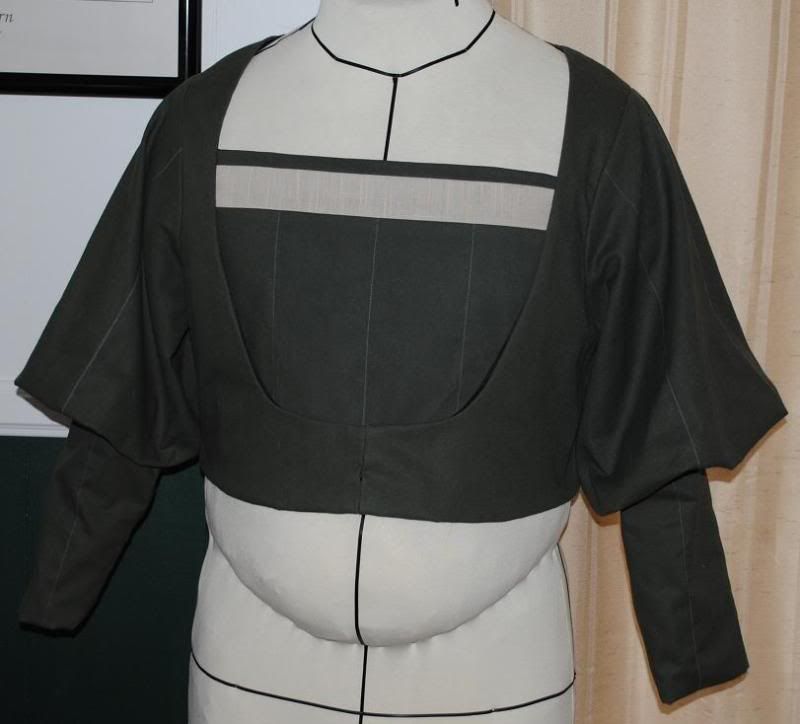
And here’s the completed doublet:


This is one that actually looks MUCH better being worn than it does hanging on the dress form, mainly because the dress form doesn’t have arms. Worn, I was so pleased that it does look very much like the image!! I’m ESPECIALLY pleased with the shoulder-upperarm transition line. *pats self on back* Basically, the upper arm is not only wider but also much longer than it appears. I used the length of the lining to “set” the length of the arm, and in turn this then locked in the poofiness without resorting to padding. If I had wanted something poofier looking, sewing some netting or such into the space between the shell and the lining would have accomplished this without adding too much weight. I chose NOT to add the netting when clearly the source image is much bulkier looking because I needed to test the lining/poofset theory without adding the extra piece at this point in time. Next time, I’ll add that and we’ll see how that does.

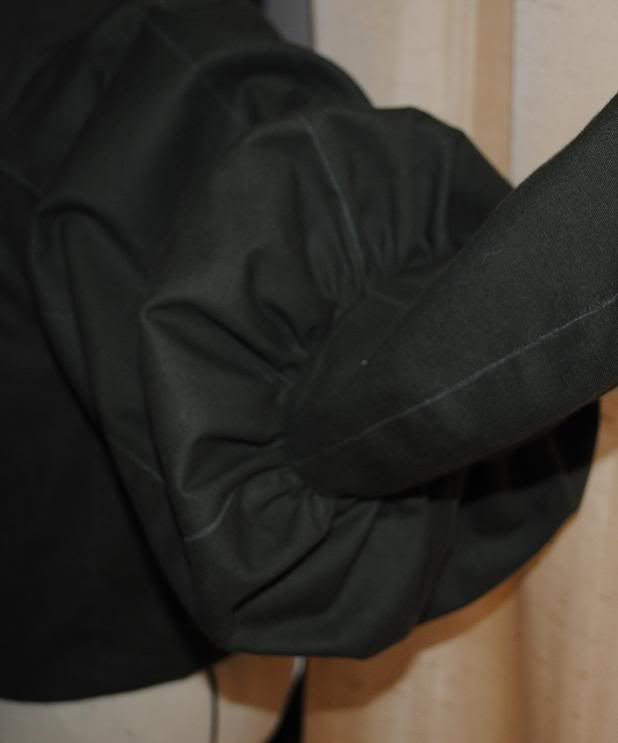
Here’s a close-up of the division between the upper and lower arms. Like in the drawing, this division is nicely obscured by the fall of the poof when worn.
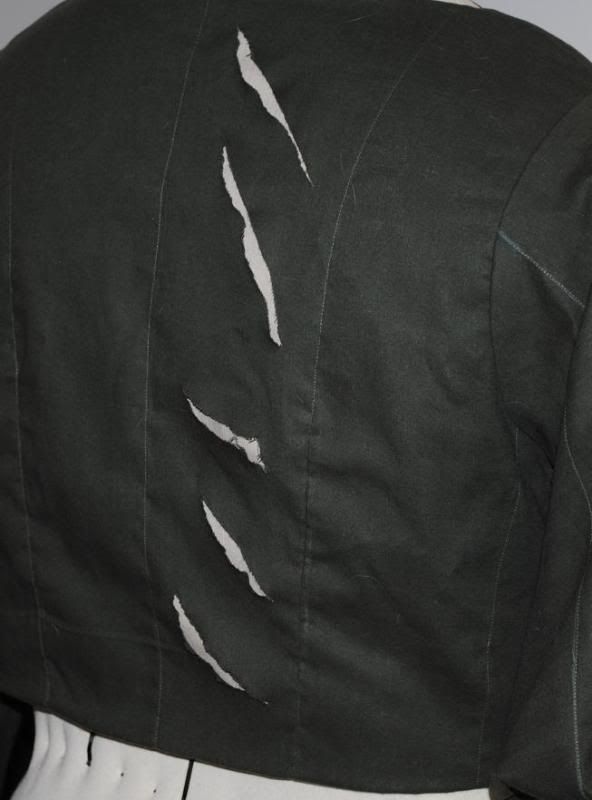
As for the idea of the slashing, here are some slashes that I literally just ripped through the outter shell to test how they would look. If they had been cut neatly, rather than quickly with a seam ripper, I’m sure they would look much better.

Had the arms fit, this garment would have eventually been slashed all over the place, with the edges of the slash being sealed with a blanket stitch to prevent the cotton weave from fraying. I think it would have been quite smashing!!
Problems:
The LINED arms never fit. Basically, there was enough fabric on the upper arm that Miles could move around and be just fine, but the moment I put lining into the garment, his mobility dropped to near nothing. I went through about 5 versions of the sleeves and never found one that worked. Because of this fatal flaw, the entire thing is now sitting in the trash and I’m going back to the drawing board to figure out how to make men’s sleeves which actually FIT men. Taking all those damn construction and pattern making classes and yet never one addressing the differences in fit for men versus is a major MAJOR oversight. MAJOR!
Now that I have the body double that I can pin to, the latest doublet (which he’s wearing this weekend and so the post-mortem will be done a bit later) actually works in terms of arm-cap fit. In short, the problem with the first pattern was that my female-bodice-trained eye kept making the armskye way too shallow for a man’s arm. Trying to correct for this, I then went the other direction and ran into a new set of problems. Very frustrating.
Another problem was that the form fiitting forearm was SERIOUSLY form fitting, esp with the lining in it. Again, he couldn’t move. If he kept his hands relaxed, it was skin tight. Closing his hands flexed those muscles and made the piece painfully tight.
Lastly, the lining was too snug circumference wise. Bare-armed, it worked just fine (except for the above noted thing). Wearing the voluminous shirt that is part of his normal kit? Nah ah. Ain’t happening.
So basically the sleeves and the armskye were foundationally flawed, necessitating the scrapping of the project and starting anew. This post-mortem is to help me keep track of the It Worked and It Didn’t Work parts. I never got around to affixing the brustflech (I never spell that right) to the piece, and that would have had a new set of challenges since I was bad and didn’t plan it into the foundation of the garment. Tacking on something that central to the garment is never a good idea, further adding to the “into the trash it now goes” outcome.


Thank you for sharing!