Posted by dravon in LiveJournal, Project Review | 2 Comments
Draping II class project #4 of 4
And this is the one I liked the most, but also the one that blew chunks on the final day. I’ve put it on the dummy and have to remove it now, but the zipper gets jammed. i had to cut the bloody thing off. GAR! Have I mentioned that loathe zippers, especially invisible zippers?? Gar! Since I had already gotten a grade, I didn’t bother to fix that, so for these images I’ve pinned it together in a less than stellar manner. *sigh*
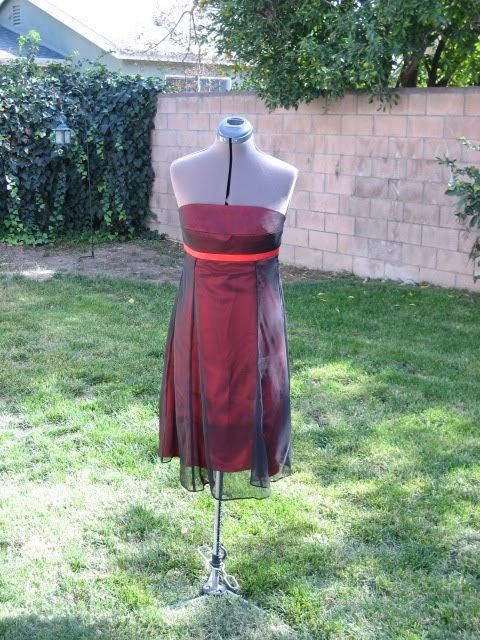
Anyway, I figured I’d done two same-on-same dresses (black on black, white on white) and now it was time to branch out and try color-on-color. I like red and black, so that’s what I did: a red satin underlayer with a black satin overlayer. While it wasn’t obvious on the white dress, the belt line did NOT have any overlayer fabric on it to compete with the belt. I figured for this dress I’d let the belt line BE the belt, and get rid of my iron-crap-foo problem at the same time. I also did away with the shoulder straps because bright red shoulder straps on the dress just looked wrong and I didn’t have time to make them with the overlayer.

In this bright light, the color difference is glaring, but in an artificial light the dress looks like a burgundy with a red belt and it looks MUCH better. I wonder what the result would have been if I had used a burgundy satin for the body, the red for the belt, and the black overlayer. eh. Who knows. I’m not going to be making this pattern again!

The entire point of this series of excercises was gaining practice working with layers of material in which you could see the layers. While it’s not quite the same thing as the Germans from the 16th century, I did learn a lot and have put those lessons into practice as I’m making M’s first doublet. Considering that now I’m not rushing to get something done by the deadline, the seams are meeting are much nicer than they did in these dresses as well. And there are no freakin’ zippers!!

You can see the seam lines didn’t meet as nicely here as they in the first one, even though it’s the same pattern. Just goes to show how the pattern can be perfect and the seamstress still effs it up! hahaha! Also, the french seam on the side, because that sheer material is doubled there, gives further illusion to how crappy the seams meet up, though in truth it matches perfectly with the belt. You can also tell, with this version, how much larger the overlayer is than the underlayer, and that was completely lost in the pictures of the first two. Plus, I didn’t screw up in cutting this overlayer like I did with the first one (another reason why the first one was funky looking).

And there you have it. The LAST of the post-mortems which have been waiting to be done! Now to finish sewing up the sleeves on M’s new doublet. It fits him amazingly!!! I think the sleeves will utterly rock too, but we’ll have to wait and see. *crosses fingers*


That was cool seeing the same pattern redone in different colors and how things can be improved and changed with practice.
And I am with you on invisible zippers. I’ve only been able to get them to line up if I take the time to hand baste them into place first… so on my wedding dress that’s all I did, hand sew them into place. It worked!
Thank you for posting these!